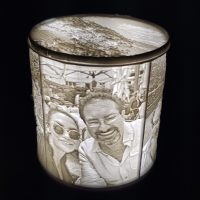
Lithophanes have captivated artists and enthusiasts with the ability to transform images into mesmerizing 3D objects. In this guide, we will dive into the world of 3D printing lithophanes, exploring image processing, layer height suggestions, optimal printer settings, and considerations for printing orientation.
1. Image Selection: Here are some key factors to consider when choosing image for lithophane:
a. Image Contrast: Select an image with good contrast between light and dark areas. Images with distinct shadows, highlights, and well-defined details tend to work best for lithophanes. High-contrast images make it easier to achieve a pronounced 3D effect and create depth in the final print.
b. Image Complexity: Consider the complexity of the image and its suitability for conversion into a lithophane. Images with clear and recognizable subjects, such as portraits, landscapes, or objects, often yield impressive results. Avoid images with intricate patterns or too much fine detail, as they may not translate well into the 3D print.
c. Aspect Ratio: Pay attention to the aspect ratio of the image. Lithophanes are typically created with a specific width-to-height ratio to ensure proper scaling and alignment. If the image’s aspect ratio does not match the desired lithophane size, you may need to crop or resize the image before processing it into a lithophane.
d. Image Resolution: Higher-resolution images generally result in better quality lithophanes with more intricate details. Choose images with a sufficient level of detail to capture the nuances you want to highlight in the final 3D printed lithophane. Keep in mind that extremely high-resolution images may require more computational power and longer processing times.
e. Subject and Composition: Consider the subject and composition of the image in relation to the desired effect. Images with well-balanced compositions and central focal points often work well for lithophanes. Think about how the light will interact with different areas of the image and how it will translate into the 3D print.
f. Personalization and Meaning: Select an image that holds personal significance or conveys a specific message. Customizing a lithophane with a photo of a loved one, a memorable moment, or a meaningful symbol adds a personal touch and makes the print more special.
Experiment with different images to find the ones that produce the best results and align with your artistic vision.
2. Image Processing: Use image editing software, such as Adobe Photoshop to prepare the image for the lithophane conversion. Perform the following adjustments:
a. Convert to Greyscale: Convert the image to greyscale to remove color information and focus solely on light and dark tones.
b. Adjust Contrast and Brightness: Enhance the contrast and brightness of the image to emphasize the details and ensure a better 3D effect in the final lithophane.
c. If the image software being used has spot or blemish healing tool consider using it to soften or remove unwanted features from the image. Distracting items from background can also be removed.
3. Lithophane Generation: Slicers like Ultimaker Cura, PrusaSlicer, and others offer built in lithophane features, allowing for an imported image to be converted to lithophane model directly in the slicer. While this is convenient for standard lithophanes, using specialized lithophane generation tools available online can yield multiple types of lithophanes with a range of control options. Some popular lithophane generator tools include LithophaneMaker, 3DP Rocks, or 3D Builder. These generators can produce multiple alternative styles of lithophanes and ease in production of custom lithophane boxes/viewers.
a. Select style: Explore the several style & shapes of lithophanes that can be generated: curved, spheres, heart shpaes, lamp shades, Christmas ornaments, and more. Select and proceed with the style that best enhances your needs.
b. Import the Image: Load your processed image into the lithophane generator software.
c. Adjust Parameters: The generator software will provide various parameters to customize your lithophane, such as width, height, thickness, and resolution. Adjust these parameters according to your desired dimensions and the capabilities of your 3D printer. The thickness of a lithophane model determines its translucency and the amount of light that passes through. Thinner lithophanes allow more light to shine through, resulting in brighter images. On the other hand, thicker lithophanes can produce a more pronounced 3D effect. Consider the desired lighting effect and the translucency level you want to achieve when determining the thickness of your lithophane.
d. Preview and Export: Preview the generated 3D model to see how it will look as a lithophane. Make any necessary adjustments to achieve the desired effect. Once satisfied, export the 3D model in a file format compatible with your 3D printer, such as STL or OBJ.
4. Optimizing Printer Settings for Lithophanes: To achieve outstanding 3d printed lithophanes, optimize the following printer settings:
a. Print Speed: Slow down the print speed to ensure accurate and precise details in your lithophane. A slower speed allows each layer to cool properly before the next one is printed.
b. Temperature: Adjust the temperature based on the filament you are using. Refer to the manufacturer’s recommendations for the optimal temperature range.
c. Infill Density: Use low infill density (around 10-20%) to maintain the translucency of the lithophane while providing structural support. Sparse infill patterns can create interesting light and shadow effects when backlit.
d. Layer Height: For lithophanes, it is recommended to use smaller layer heights to capture fine details and achieve smooth transitions between light and dark areas. For a standard 0.4 mm nozzle, a layer height of 0.1mm to 0.2mm is commonly used for high-quality lithophane prints. Experiment with different layer heights to find the balance between detail and printing time that suits your specific project.
e. Preview: Use the slicer’s preview mode to ensure the lithophanes has a deep enough base layer to prevent unwanted holes or gaps in layers.
5. Consideration for Printing Orientation: The models orientation on build plate can significantly impact the appearance and depth of your final 3d printed lithophane. Here are a few considerations:
a. Vertical Printing: 3D printing lithophanes vertically allows for better resolution along the z-axis and can result in a more pronounced 3D effect. This orientation is ideal for designs with prominent features that you want to highlight. Smaller layer lines are key to obtaining fine detail especially for this orientation.
b. Horizontal Printing: 3D printing lithophanes horizontally (flat on the print bed) offers a smoother surface and can be suitable for designs with intricate details or subtle transitions between light and dark areas. This orientation is ideal for achieving a flatter overall appearance. However blobs, stringing, seams, and etc. can potentially have greater unwanted effects on the print with this orientation and will take more post processing time to clean-up the print.
c. Y-Axis Alignment: By rotating the model to align with the printers Y-axis can yield smoother prints. The reason for this is the Y-axis on most printers tends to be built more solid than the X-axis bar which correlates to less vibrations, by aligning to the Y-axis more of movements will be in the sturdier directions. Since lithophanes are printed with narrow layer heights any increase in vibration will have a more pronounced effect on the quality of the 3D printed lithophanes.
Experiment with different printing orientations to see which one best suits your design and desired outcome. Keep in mind that the orientation may also affect the required supports and the print time. Most lithophanes, including vertical orientations, can print without supports, but depending on geometry of your print supports may be required.
6. Material Selection: Bringing Your Lithophane to Life:
Choose a filament material that enhances the interplay of light and shadow in your lithophane. Translucent or light-diffusing filaments, such as PLA or PETG, work well for lithophanes. White PLA is a common choice that can yield excellent results as PLA is fairly easy to print with fine detail and layer lines less pronounced in white. Experiment with different materials to achieve the desired level of translucency and visual effect. A personal favorite of mine for 3D printing lithophanes is 3D-Fuel Snow White Pro PLA+ filament.
3D printing lithophanes offers stunning keepsakes. With the knowledge gained from this guide, you can unleash your creativity, bringing your ideas and memories to life. Embrace the art of 3D printing lithophanes and watch as your prints radiate beauty and fascination.
May your 3D Journey be filled with precious memories.

